
Companion Plants
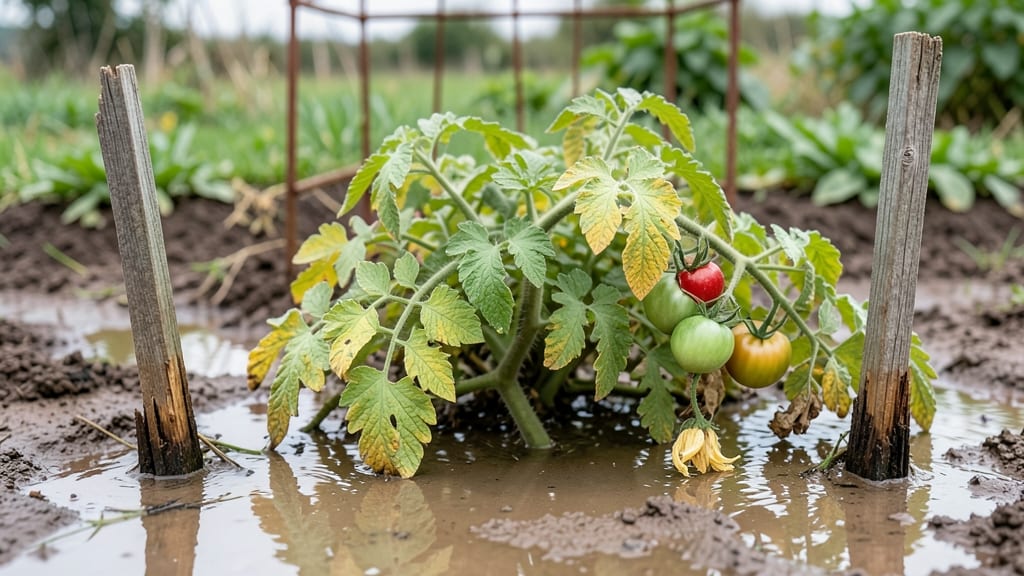
Waterlogged tomato plants can turn your garden from productive to pathetic in days. 🌱 I’ve seen thriving vines collapse into sad, yellowing messes after just one heavy rain—until I learned these three steps to revive them.
The key isn’t just draining water but fixing the soil’s ability to breathe so roots recover fast.
First, stop watering until the soil feels like a damp sponge, not a swamp. Prune any blackened leaves to redirect energy, then loosen the top 6 inches of soil around the roots with a fork.
This alone can prevent root rot from spreading. Most gardeners overlook how quickly roots suffocate—even in containers.
You’ll notice new green growth within a week if the roots are still alive. For long-term fixes, mix in 2 inches of compost and consider raised beds or containers next season—waterlogged soil is the silent killer of tomato plants. The payoff? Plants that bounce back stronger than before.
This works for both in-ground and container tomatoes, though raised beds speed up recovery. The secret isn’t just drainage—it’s giving roots the chance to dry out between waterings. Let’s turn those sad plants into thriving vines again.
Root Issues Behind Tomato Struggles
When your tomato plants wilt despite soggy soil, the problem often lies beneath the surface—literally. Waterlogging disrupts the delicate balance of oxygen, nutrients, and microbial life in the root zone, triggering a cascade of stress responses.
Understanding the root causes (pun intended) helps you address the issue before it’s too late. Here’s why your plants might be drowning in their own downpour.
Soil composition is the #1 culprit behind waterlogged tomato roots. Heavy clay soils, compacted dirt, or poorly amended garden beds act like a sponge that never releases water. When rain or overwatering occurs, excess moisture fills the pores between soil particles, pushing out oxygen—a critical component for root respiration.
- Why it matters: Roots need at least 10% oxygen to function. Below 5%, they suffocate, leading to:
- Stunted growth (roots can’t absorb nutrients efficiently)
- Grayish or blackened roots (signs of anoxic stress)
- Fungal infections (like Phytophthora, a water-loving pathogen)
- Actionable fix: Test your soil’s drainage by digging a 12-inch hole, filling it with water, and timing how long it takes to drain. If it’s slower than 4–6 hours, amend with:
- Coarse sand or perlite (20–30% of soil volume)
- Compost or aged manure (to improve structure)
- Gypsum (for clay-heavy soils)
Tomatoes thrive with consistent moisture but hate soggy conditions. Overzealous watering—especially without checking soil moisture—or prolonged rainy seasons create a double whammy. Roots in waterlogged soil can’t "breathe," and excess moisture leaches away vital nutrients like nitrogen and phosphorus.
- Key red flags:
- Yellowing leaves (especially lower ones)
- Wilting despite wet soil (a classic sign of oxygen deprivation)
- Foul-smelling soil (indicates anaerobic bacteria thriving)
- Science behind it: Waterlogged roots trigger the production of ethylene gas, a plant stress hormone that accelerates leaf drop and weakens cell walls. Over time, this leads to:
- Root rot (Pythium or Fusarium)
- Reduced flowering/fruiting (plants prioritize survival over reproduction)
- Quick solutions:
- Water deeply but infrequently (1–1.5 inches per week, except during fruiting).
- Use drip irrigation or soaker hoses to target roots directly (avoid overhead watering).
- Mulch with straw or wood chips to regulate soil moisture.
Container-grown tomatoes face unique waterlogging risks due to limited drainage and root restriction. Small pots or those without adequate drainage holes become deathtraps when overwatered, as roots circle the container and suffocate in compacted, soggy soil.
- Why containers fail:
- No escape route: Water pools at the bottom, starving roots of oxygen.
- Root-bound stress: Circling roots compete for space and nutrients, weakening the plant.
- Heat trapping: Plastic pots overheat in sunlight, accelerating moisture loss from leaves (leading to overcompensation watering).
- Container-specific fixes:
- Upgrade to pots at least 12–18 inches deep with drainage holes.
- Use a fast-draining mix: 60% potting soil, 20% perlite, 20% coconut coir.
- Check soil moisture with your finger—top 2 inches should dry out between waterings.
Pro tip: 💡 If your tomatoes are already waterlogged, don’t panic—this article’s 3-step revival plan can help! The key is acting fast to restore oxygen and prevent permanent damage.
Revive Your Tomatoes: Step-by-Step Fixes
If your tomato plants are struggling from soggy soil, don’t panic—there’s hope! The key is acting fast to improve drainage, aerate roots, and prevent further damage. Below, we break down solutions by cause, so you can tackle the problem head-on with practical, garden-tested fixes.
Fix: Drainage is the #1 enemy of waterlogged roots. Here’s how to dry things out:
- 🔥 Raise the Plant Temporarily If possible, lift the plant (with soil intact) and set it on a raised bed, wooden pallet, or even a mound of soil mixed with compost. This lets excess water escape while keeping roots moist but not drowning.
- 🍳 Dig a Drainage Trench Use a shovel to create a shallow trench (6–8 inches deep) around the base of the plant, sloping away from it. Fill it with gravel or coarse sand to redirect water.
- 👨🍳 Amend the Soil Mix in organic matter like coconut coir, perlite, or well-aged compost to loosen compacted soil. Avoid fresh manure—it can burn roots when wet.
- ⏰ Wait Before Watering Let the soil dry out for 2–3 days before adding more water. Stick your finger 1–2 inches deep—if it’s still damp, hold off!
💡 Prevention Tip: Install French drains (perforated pipes wrapped in landscape fabric) near garden beds to channel excess water away. For containers, ensure pots have drainage holes and use a cache pot (a tray under the pot) to catch runoff.
Fix: Adjust your watering habits to avoid soggy roots.
- 🥘 Water Deeply but Less Often Instead of daily light sprinkles, water once every 3–5 days (depending on climate) with 1–2 inches of water per session. Use a soaker hose or drip irrigation to deliver water slowly at the base.
- 🔪 Prune Damaged Foliage Yellow or black leaves? Snip them off to redirect energy to healthy growth. Sterilize your pruners with rubbing alcohol to prevent disease spread.
- 🌡️ Check Your Soil’s Moisture Level Use a moisture meter or the finger test: If the top 2 inches of soil are dry, it’s time to water. If it’s still wet, wait.
💡 Prevention Tip: Set up a rain gauge to track rainfall and adjust watering accordingly. Group tomatoes with drought-tolerant companions like basil or marigolds—they thrive in similar conditions and won’t demand extra moisture.
Fix: Break up heavy soil to improve airflow and drainage.
- ✨ Aerate the Soil Use a garden fork to poke holes 6–8 inches deep around the plant’s drip line (the area where leaves extend outward). This creates channels for water to escape.
- 🎯 Add Sand or Grit (Sparingly!) Mix coarse sand or horticultural grit into the top 6 inches of soil to prevent compaction. Avoid river sand—it can compact over time.
- 🌿 Mulch Strategically Apply a 2–3 inch layer of straw or wood chips around the base (keep it 2 inches away from the stem). Mulch slows evaporation and keeps roots cool, but don’t pile it high—this can trap moisture.
💡 Prevention Tip: Before planting, test your soil’s texture. Clay soil? Amend it with compost and peat moss in a 1:1 ratio. For containers, use a well-draining potting mix (like 60% potting soil, 30% perlite, 10% vermiculite).
Fix: Waterlogged conditions invite fungi and pests—act fast!
- 🍄 Treat Fungal Issues If you spot blossom end rot (cracked fruit) or early blight (brown spots), spray with a copper fungicide or baking soda solution (1 tsp baking soda + 1 quart water + a drop of dish soap). Avoid wetting leaves when watering.
- 🐜 Combat Pests Slugs and snails love damp soil. Set up beer traps (bury a cup filled with beer) or use diatomaceous earth around the base. For aphids, blast them off with water or introduce ladybugs as natural predators.
- 🌿 Boost Plant Immunity Feed your tomatoes with a balanced fertilizer (like 10-10-10) or a seaweed extract to strengthen their defenses.
💡 Prevention Tip: Rotate crops yearly to prevent soil-borne diseases. Plant garlic or chives nearby—their strong scent repels pests and improves soil health.
Remember: Tomato plants are resilient! With the right fixes, they’ll bounce back stronger. Monitor progress over the next week—you should see new growth within 5–7 days if the soil drains properly. 🍅💦
Frequently asked questions
How quickly can waterlogged tomato roots recover?
With immediate action, you’ll often see signs of recovery within 3-5 days—new green leaves or firmer stems. Full revival typically takes 1-2 weeks if roots aren’t severely rotted. The key is stopping watering and improving drainage right away to prevent permanent damage.
Can I still harvest tomatoes from waterlogged plants?
Yes, but prioritize existing fruit over new growth. Waterlogged plants will focus energy on survival, so established tomatoes may ripen while new blossoms drop. Harvest any ripe fruit immediately to reduce stress on the plant.
What’s the best way to test if my tomato soil is waterlogged?
Dig down 6 inches—if the soil feels cold, smells foul, or has a grayish tint, it’s waterlogged. For a quick test, press your finger in: if water pools or oozes out, drainage is poor. Clay soils are especially prone to this.
Will my tomatoes survive if roots turn black?
Black roots indicate advanced rot, but some recovery is possible if only outer roots are affected. Trim away mushy black sections with sterilized scissors, then improve drainage. If the core roots are healthy, new growth may still emerge within 2 weeks.
Can I use coffee grounds to fix waterlogged tomato soil?
Not directly—coffee grounds compact when wet, worsening drainage. However, use them as mulch after fixing waterlogging (mix with straw first). For immediate help, focus on aerating soil with perlite or compost instead.