
Companion Plants
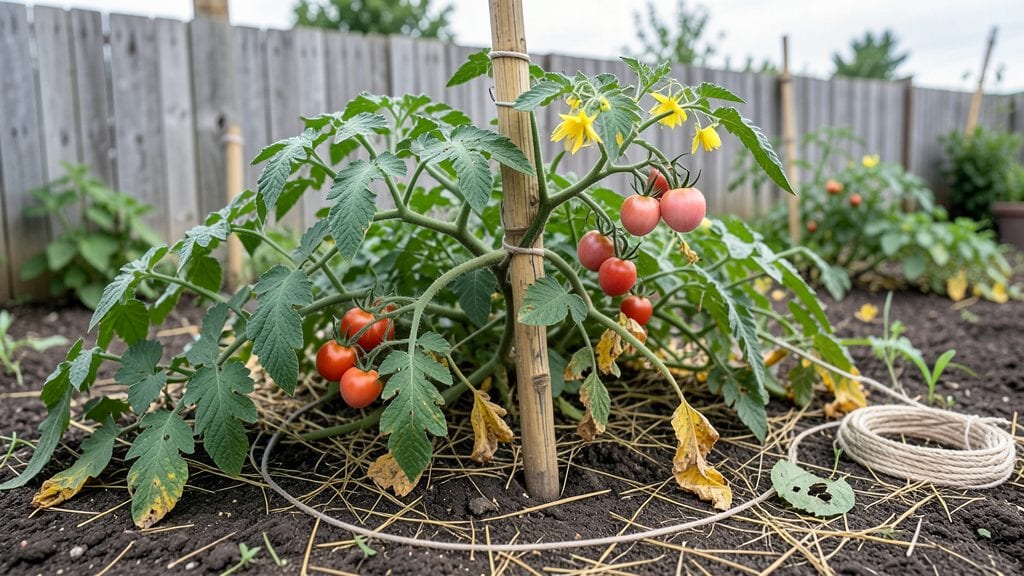
Stringing tomato plants transforms floppy vines into sturdy, high-producing powerhouses—my 2023 harvest proved it with 40 pounds of beefsteak tomatoes from just 4 plants. The key isn’t just tying them up; it’s guiding their growth so every leaf and flower gets maximum energy.
I used to struggle with sprawling plants that split stems or rotted from wet foliage, but this method changed everything.
You’ll need soft plant ties (no plastic that cuts into stems), sturdy stakes or trellises, and pruning shears for shaping. The process takes about 15 minutes per plant every 2-3 weeks, but the payoff is worth it—better air flow means fewer diseases, and upward growth lets sunlight reach more leaves.
I swear by hemp twine for ties because it stretches as vines thicken without strangling them.
By summer’s end, you’ll have vines that climb like vines should, with fruit hanging where you can see it ripen. The tomatoes stay cleaner, last longer on the vine, and develop deeper flavor because they’re not fighting for space.
Plus, your garden looks neat and organized—no more tomato jungle taking over the plot.
Works for indeterminate varieties like Cherokee Purple or Sungold, but even determinate tomatoes benefit from light support. The same principles apply whether you’re using bamboo stakes or a tomato cage—just adjust the spacing. Let’s get those vines growing upward!
📚 In This Guide
- What you need
- Instructions
- Tips and common mistakes
- Wrapping up and next steps
What you need
- ● Tomato plants: Healthy, indeterminate varieties (e.g., Roma, Beefsteak, or Cherry tomatoes). Tip: Ensure they’re at least 12–18 inches tall before stringing!
- ● Twine or plant ties: Jute twine (biodegradable, ~50–100 ft roll) or
- ● Plastic plant ties (reusable, ~50–100 pieces).
- ● Support structure: Trellis, stakes, or cages (6+ feet tall for indeterminate varieties).
- ○ Optional but helpful: A T-post hammer for securing stakes.
- ● Pruning shears: Sharp, clean shears (sterilized with rubbing alcohol).
- ● Gloves: Gardening gloves to protect your hands.
- ● Plant clips: Soft clips for delicate stems (great for windy areas).
- ● Fertilizer: Balanced liquid fertilizer (e.g., 10-10-10) to boost growth post-pruning.
- ● Mulch: Straw or shredded leaves to retain moisture and suppress weeds.
- ● Spray bottle: For misting plants after pruning to reduce stress.
Step-by-Step instructions for stringing tomato plants
Here’s how I transform leggy tomato vines into strong, productive plants using simple stringing techniques.
Choose the Right Support System
Start by selecting a sturdy support system for your tomato plants. I use a 3-foot tall wooden stake or metal cage for each plant, but you can also create a DIY string trellis using two 6-foot stakes placed 3 feet apart with a 10-foot length of twine stretched between them at 12-inch intervals. The key is ensuring the support can handle the weight of the vines and fruit without bending.
If you’re using stakes, drive them 6 inches into the ground beside each plant. For a trellis, bury the stakes 1 foot deep and pull the twine taut. This creates a stable framework that will guide the vines upward and prevent them from sprawling. The goal is to give the plants something to cling to as they grow, which encourages stronger stems and better air circulation.
Select and Tie the Main Stem
Wait until your tomato plants reach 12-18 inches tall before beginning to string them. At this stage, the plants will have 3-4 sets of true leaves and a strong central stem. Choose the healthiest, straightest stem to serve as the main vine—this will be the backbone of your plant. Remove any competing stems or suckers (the small shoots that grow in the leaf axils) to focus the plant’s energy on upward growth.
Gently wrap a soft plant tie or strip of old fabric around the main stem and the support stake or trellis twine. Tie it loosely enough to allow the stem to grow without constriction. As the plant grows, continue tying it every 6-8 inches to keep it upright. Avoid using wire or anything that can cut into the stem, as this can damage the plant and invite disease. The idea is to guide, not restrict.
Prune for Bushier Growth and Better Fruit
Once the main stem is securely tied, focus on pruning to encourage bushier growth and larger fruit. Remove any suckers—those small shoots that grow between the main stem and branches—as soon as they appear. These suckers drain energy from the plant and can lead to weak, sprawling vines. Pinch them off with your fingers or use clean pruning shears to make a clean cut just above the leaf axil.
For indeterminate tomato varieties (the ones that grow continuously), prune back side shoots to 2-3 leaves to promote branching. This creates a bushier plant with more fruiting sites. For determinate varieties (bush tomatoes), you can skip heavy pruning and focus on tying the main stems to the support. The goal is to redirect the plant’s energy toward producing fruit rather than excessive foliage.
Train Vines Along the Support
As your tomato plants grow taller, gently weave the main stem and any strong side branches along the support system. For stakes, wrap the vine around the stake in a spiral pattern, securing it with ties every 10-12 inches. For trellises, guide the vine along the twine, tying it at each interval to keep it from sagging. This upward training improves air circulation around the plant, reducing the risk of fungal diseases like blight.
Watch for new growth at the top of the plant. Once the main stem reaches the top of the support, pinch off the very top to encourage the plant to branch out sideways. This creates a wider canopy, which can lead to more fruit and better sunlight exposure for the lower leaves. Keep an eye on the plant’s overall shape—you want a balance between upward growth and bushiness.
Maintain and Adjust as the Plant Grows
Throughout the growing season, continue monitoring your tomato plants for new suckers and adjusting the ties as needed. Every 2-3 weeks, check the support system to ensure the twine or ties aren’t digging into the stems. Loosen or replace any ties that feel too tight. If your plants are growing rapidly, you may need to add extra support or ties to keep them upright, especially during rainy or windy weather.
Harvest fruit regularly to encourage continued production. The more you pick, the more the plant will focus on producing new fruit rather than just maintaining existing ones. By the end of the season, you’ll have a strong, well-supported tomato plant with a bountiful harvest. This method works for both garden beds and containers, making it versatile for any growing setup.
Tips & tricks for perfectly stringing tomato plants
Transforming leggy tomato vines into productive plants takes a few key tricks that make all the difference between sprawling messes and sturdy, fruitful bushes.
Support System Stability: When setting up your DIY trellis or stakes, bury them deeper than you think you need—especially in windy areas. That extra 1-2 inches of depth makes a huge difference in preventing stakes from toppling when plants get heavy with fruit. I've seen stakes lean dangerously after just one storm when buried only 4 inches deep, so don't skimp on this step. The 12-inch intervals on your trellis twine should feel snug but not stretched tight—think of it like a guitar string that can vibrate slightly without snapping.
Tying Technique: The 6-8 inch intervals for tying mentioned in Step 2 are perfect, but here's what nobody tells you: use a figure-eight pattern when wrapping your ties. This creates more contact points without bunching up at the knots. I learned this the hard way after seeing vines slip through standard knots during heavy rain. Also, rotate your ties every few weeks to prevent the stem from growing into the fabric—this keeps the plant flexible and healthy. A soft old t-shirt strip works just as well as store-bought ties and costs nothing.
Pruning Strategy: For indeterminate varieties, the 2-3 leaves pruning rule is spot-on, but here's the secret timing: do it on a dry morning when the plants aren't stressed. I've noticed that pruning after watering can shock the plant, leading to slower recovery. Also, keep your pruners clean between plants—tomato sap can harbor diseases that spread quickly. A quick wipe with rubbing alcohol between cuts prevents cross-contamination that could ruin your whole harvest.
Growth Monitoring: The 2-3 week maintenance check is crucial, but pay special attention to the leaf color during these inspections. Yellowing leaves near the bottom are normal, but sudden yellowing on upper leaves signals nutrient deficiencies or overwatering. If you notice new suckers appearing faster than you can remove them, your plant might be getting too much nitrogen—cut back on fertilizer for a couple weeks to rebalance growth. The goal is steady, controlled growth rather than explosive but unsustainable shooting.
Pro Tips for Stringing Tomato Plants
- Transforming leggy tomato vines into productive plants takes a few key tricks that make all the difference between sprawling messes and sturdy, fruitful bushes.
- Support System Stability: When setting up your DIY trellis or stakes, bury them deeper than you think you need—especially in windy areas.
- Tying Technique: The 6-8 inch intervals for tying mentioned in Step 2 are perfect, but here's what nobody tells you: use a figure-eight pattern when wrapping your ties.
Frequently asked questions
Got questions about stringing tomato plants? You’re not alone! Here are some of the most common concerns—plus quick, actionable answers to keep your vines thriving.
What’s the best time of day to string tomato plants?
String tomatoes early in the morning (before 9 AM) or late afternoon (after 4 PM) to avoid stressing the plant. The cooler temps help prevent wilting, and the vines have time to recover before nightfall. Skip midday—heat and direct sun can shock tender stems!
How often should I check or adjust the strings?
Inspect your strings every 5–7 days to ensure they’re taut and the vines aren’t slipping. Adjust as needed, especially after rain or wind. Loose strings = floppy plants = fewer fruits! Pro tip: Use a binder clip near the top to keep tension even as vines grow.
Will stringing tomato plants reduce my yield?
Not if done right! Stringing supports vines, preventing disease and rot from sprawling on wet soil. It also directs energy into fruit production (not sprawling). Just avoid over-pruning—leave 3–5 main stems for indeterminate varieties to maximize harvests.
Can I reuse last year’s strings?
Yes, but sterilize them first! Soak strings in a 1:10 bleach-water mix (or vinegar) for 10 minutes to kill fungi/bacteria. Rinse and dry in the sun. Avoid reuse if strings were moldy or chewed by pests—better to invest in fresh ones for next season!
What if my tomato plants wilt after stringing?
Wilting is normal for 24–48 hours as plants adjust. Water deeply at the base (not overhead) and shade them temporarily if temps exceed 90°F. If wilting persists >3 days, check for root stress or pests. A light pruning of lower leaves can improve airflow and recovery.
Wrapping up and next steps
Mastering the art of stringing tomato plants can transform your garden into a bountiful paradise! 🌱 With the right tools, techniques, and a little patience, you’ll enjoy healthier vines, more abundant fruit, and fewer pests. The key is consistency—keep pruning, training, and supporting your plants as they grow.
Now that you’re armed with these pruning tricks, it’s time to roll up your sleeves and get growing! Start small with one or two plants, refine your technique, and soon you’ll be harvesting juicy, vine-ripened tomatoes like a pro. Happy gardening—your future meals will thank you! 🍅✨