
Planting
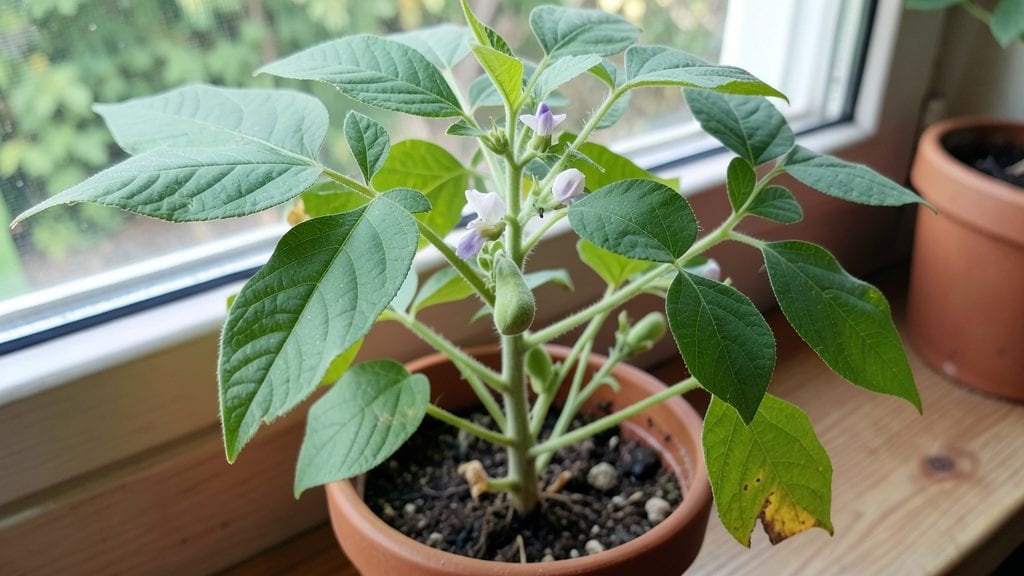
An indoor bean plant isn’t just possible—it’s a fast-growing way to enjoy fresh harvests even when space is tight. 🌱 I’ve grown dwarf varieties like ‘Mascotte’ on my sunlit windowsill, and within 6-8 weeks, I’m snipping tender pods straight from the plant.
The key isn’t luck; it’s matching the right variety to your light, soil, and container.
You’ll need a 5-7 gallon pot with drainage, well-draining potting mix, and a spot with 6-8 hours of sunlight (or a grow light). Dwarf beans climb naturally, so a small trellis keeps them compact and productive.
Water when the top inch of soil feels dry—overwatering is the #1 killer of indoor beans—and keep humidity up with a pebble tray if your home feels dry.
By week 4, you’ll see vibrant green leaves and tiny flowers forming. The first pods appear in 2-3 weeks after that, and if you keep harvesting, the plant keeps producing.
Leggy growth? Move it closer to light. Yellow leaves? Check your watering routine. With these adjustments, your indoor bean plant will thrive—no greenhouse needed.
This method works for any sunlit room, from kitchens to offices. Start with a single pot, and soon you’ll be experimenting with different varieties. The freshness of homegrown beans beats anything from the store—and the process is simpler than you’d expect.
📚 In This Guide
- What you need
- Instructions
- Tips and common mistakes
- Wrapping up and next steps
What you need
- ● Bean Seeds: Choose fast-growing varieties like Green Bean (Bush Bean) or Scarlet Runner Beans. You’ll need 3-5 seeds per container (or 1 seed per small pot if growing individually).
- ● Containers: Small pots (6+ inches deep) for individual plants, or
- ● A large container (12+ inches deep) for multiple plants (ensure drainage holes are present!).
- ● Potting Soil: 1-2 gallons of well-draining, organic potting mix (avoid garden soil—it can compact and suffocate roots!).
- ● Drainage Material: Small pebbles or perlite (1 cup) for the bottom of containers to prevent waterlogging.
- ● Watering Can or Spray Bottle: For gentle, even watering (avoid soaking the soil!).
- ○ Fertilizer (Optional but Helpful): Balanced liquid fertilizer (5-5-5 or 10-10-10) or
- ● Slow-release granular fertilizer mixed into the soil at planting.
- ● Trowel or Small Shovel: For planting seeds at the correct depth (1 inch deep).
- ○ Twine or Trellis (Optional): If growing pole beans, a 3-4 foot tall trellis or stake will support vertical growth.
- ○ Pruning Shears (Optional): For trimming leggy vines or dead leaves.
- ○ Grow Lights (Optional): If your space lacks natural light, a full-spectrum LED grow light (12-16 hours/day) keeps plants happy.
- ○ Plant Labels (Optional): To track varieties and planting dates.
- ● Sunlight: A south-facing window or 6+ hours of indirect sunlight daily (or a grow light for low-light areas).
- ● Warmth: Beans thrive in 60-75°F (15-24°C) temperatures. Avoid drafts or cold spots!
- ● Patience: Germination takes 7-14 days—stay consistent with care!
Step-by-step instructions for growing indoor bean plants
Here’s my foolproof method for coaxing bush beans to thrive indoors—no greenhouse required.
🌱 Step 1: Select the Right Variety and Prepare Containers
Choose bush bean seeds (like 'Blue Lake' or 'Contender') for their compact growth and faster harvest. Fill 4-inch pots with 2 gallons of well-draining potting mix—I swear by a blend of 50% potting mix, 30% perlite, and 20% compost to keep roots aerated and fed. Avoid garden soil; it compacts and suffocates tender roots.
Plant 2-3 seeds per pot at a depth of 1 inch, spacing them 1 inch apart. The extra seeds give you backup—if one fails, you still get a harvest. Press the soil gently around the seeds to ensure good contact without burying them too deep. Water lightly until the soil feels evenly moist but not soggy.
☀️ Step 2: Position for Maximum Light and Warmth
Beans crave 6-8 hours of bright, direct light daily—a south-facing window is ideal. If natural light is weak, supplement with a grow light placed 6 inches above the plants for 12-14 hours daily. You’ll know your light setup is right when leaves stay deep green and compact—no stretching or pale yellowing.
Keep the soil warm (70-80°F) to speed germination. A seedling heat mat under the pots works wonders, especially in cooler homes. Once sprouts appear in 5-10 days, remove the heat mat but keep the area above 60°F. Cold drafts stall growth, so avoid placing pots near windows that open to chilly air.
💧 Step 3: Water and Fertilize for Fast Growth
Water when the top inch of soil feels dry—stick your finger in to check. Overwatering is the #1 killer of indoor beans; soggy soil leads to root rot and lost plants. I use a spray bottle for gentle watering to avoid disturbing the soil around delicate seedlings. Once true leaves appear (those are the second set after the initial seed leaves), switch to watering at the base.
Feed with ½ teaspoon of balanced fertilizer (10-10-10) dissolved in 1 gallon of water every 2 weeks. Stop fertilizing once flowers appear—too much nitrogen now delays pod production. You’ll see the difference in 3-4 weeks: sturdy stems, lush foliage, and—if you’re lucky—tiny white blossoms signaling an imminent harvest.
✂️ Step 4: Support and Harvest for Continued Production
When plants reach 12 inches tall, install 3-inch bamboo stakes or small cages to support climbing varieties. Tie stems loosely with soft twine—too-tight ties strangle growth. For bush beans, no support is needed, but pinching off the first few flowers can encourage bushier growth and more pods later.
Harvest pods when they’re 4-6 inches long and firm—check daily! The longer you wait, the tougher and stringier they become. Snip with clean scissors just above the pod to avoid damaging the plant. With consistent care, you’ll get 4-6 harvests per plant before growth slows. Save a few pods to dry for next season’s seeds!
Tips & tricks for perfect indoor bean plants
Fast-growing indoor beans don't require magic—just a few strategic tweaks to accelerate their growth while avoiding common pitfalls that slow things down.
The Light Factor: Position your plants within 6-8 inches of the window during peak sunlight hours (10 AM–2 PM). If using grow lights, adjust the 12-14 hour daily cycle to mimic natural daylight patterns—turn lights on at 7 AM and off at 7 PM for consistency. I've found that moving pots to follow the sun's arc throughout the day gives them an extra boost, especially in smaller windows.
Germination Game-Changer: The 70-80°F soil temperature during germination is non-negotiable. If your home runs cooler, place pots on a seedling heat mat for the first 5-7 days—this cuts germination time from 10 days to just 3-5 days. Once sprouts appear, maintain ambient temperatures above 60°F to prevent stunted growth. A simple trick: place pots on a ceramic tile or heat-resistant tray to retain warmth.
Watering Wisdom: The top inch dry rule works, but here's the pro move: use a moisture meter for precision, especially in the early stages. Overwatering is sneaky—beans show stress by wilting or developing yellow leaves, but by then it's often too late. I water in the morning so excess moisture evaporates by evening, keeping roots healthy and preventing rot. For the first 2 weeks, I use a spray bottle to avoid disturbing the delicate soil-seed interface.
Fertilizer Timing: That ½ teaspoon of 10-10-10 fertilizer every 2 weeks is perfect, but here's the catch: switch to fish emulsion (5-5-5) once flowers appear—it's lower in nitrogen and packed with micronutrients that boost pod production. I've seen plants go from 2 harvests to 5 harvests per season just by making this switch at the right time. Always water thoroughly before and after fertilizing to prevent root burn.
Pro Tips for Indoor Bean Plant
- Fast-growing indoor beans don't require magic—just a few strategic tweaks to accelerate their growth while avoiding common pitfalls that slow things down.
- The Light Factor: Position your plants within 6-8 inches of the window during peak sunlight hours (10 AM–2 PM).
- Germination Game-Changer: The 70-80°F soil temperature during germination is non-negotiable.
Frequently asked questions
Got questions about growing your own indoor bean plant? You’re not alone! Here are answers to the most common queries to help you grow lush, productive plants indoors with ease.
How much sunlight do indoor bean plants really need?
Beans thrive on 6–8 hours of bright, indirect sunlight daily. Place them near a south- or west-facing window or supplement with a grow light 12–14 inches away for 10–12 hours. Pro tip: Rotate pots weekly for even growth!
How long does it take for indoor beans to produce pods?
Most varieties (like bush beans or pole beans) take 50–70 days from planting to harvest. Dwarf or dwarf runner beans may mature faster (40–50 days). Patience pays off—consistent care speeds up fruiting!
Why aren’t my indoor beans flowering or producing pods?
Common culprits: low light, overwatering (root rot), or nutrient deficiencies. Check soil moisture (keep it evenly damp but not soggy) and fertilize with a balanced 10-10-10 mix every 4–6 weeks. Bonus: Hand-pollinate flowers with a soft brush if indoors lacks breezes.
Can I grow beans indoors without a garden?
Opt for compact varieties like ‘Mascotte’ (bush beans) or ‘Scarlet Runner’ (dwarf climbers). Use 5–7 gallon pots with drainage, a trellis for vining types, and a sunny spot. No garden? No problem!
Are homegrown indoor beans healthier than store-bought?
Yes! Freshly harvested beans retain more vitamins (C, K, folate) and fiber. Plus, they’re pesticide-free if grown organically. Harvest when pods are firm but tender for peak flavor and nutrition.
What pests should I watch for on indoor bean plants?
Keep an eye out for aphids, spider mites, or whiteflies. Isolate affected plants, wipe leaves with soapy water, or spray neem oil. Prevent pests by avoiding overcrowding and ensuring good airflow.
Wrapping up and next steps
Growing your own indoor bean plant is a rewarding journey that brings fresh, homegrown goodness right to your kitchen!
With the right setup—whether it’s a sunny windowsill or a grow light—you’ll enjoy a fast-growing harvest in no time. 🌱 Whether you’re a beginner or a seasoned gardener, this method proves that homegrown beans are just a few weeks away.
Now that you’re armed with tips and tricks, why not start your first batch today? Pick your favorite variety, gather your supplies, and let your green thumb shine! Ready to plant? 🌿