
Diseases
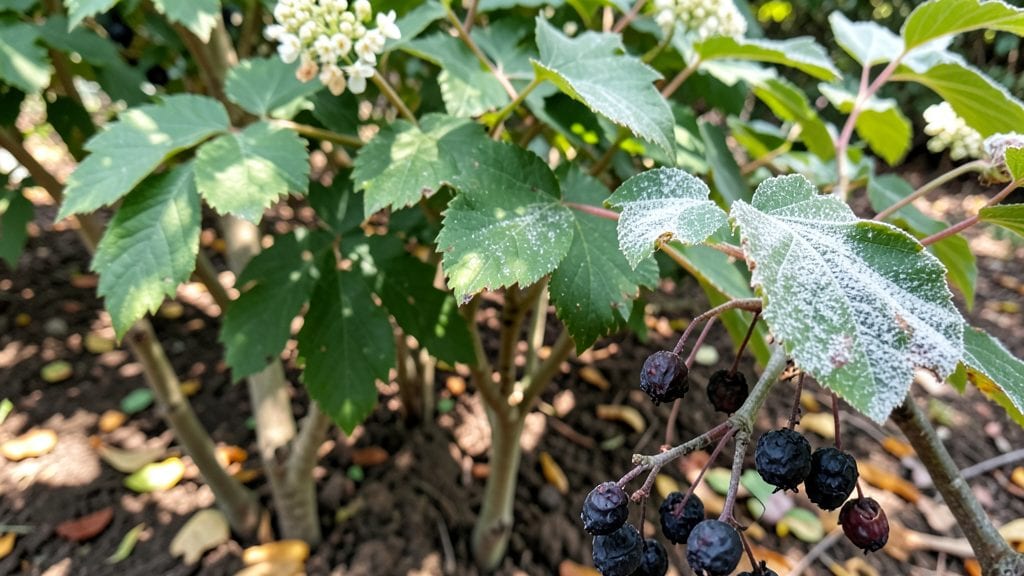
Elderberry plant diseases like powdery mildew and leaf spot can turn your thriving bushes into sad, spotted shadows—until you know how to spot and stop them. 🌿 I’ve seen entire rows of elderberries go from lush to limp in just a few weeks, but the right moves can save them.
The key is catching problems early, using simple fixes, and adjusting how you care for the plants to keep them strong.
Start by learning the warning signs: white powder on leaves means powdery mildew, while brown spots with yellow rings scream leaf spot. Prune affected branches in late winter or early spring, and always sterilize your tools to avoid spreading trouble.
A mix of copper spray, neem oil, or baking soda can tackle mild infections, while severe cases might need a stronger fungicide—but prevention beats cure every time.
📚 In This Guide
- What you need
- Instructions
- Tips and common mistakes
- Wrapping up and next steps
What you need
- ● Pruning shears – Clean, sharp, and sterilized (1 pair, 4-6" blades)
- ● Gloves – Nitrile or rubber gloves (1 pair, waterproof)
- ● Spray bottle – 16-32 oz, with a fine mist nozzle (for targeted treatments)
- ● Fungicide – Copper-based (e.g., Bordeaux mixture) – 1 lb per gallon of water
- ● Neem oil (organic option) – 1-2 tbsp per gallon of water
- ○ Hose with nozzle – For thorough watering/cleaning (optional but recommended)
- ● Disinfectant (e.g., bleach or rubbing alcohol) – For sterilizing tools (1 small bottle)
- ○ Magnifying glass – Optional but helpful for spotting early symptoms (3-5x magnification)
- ● pH testing kit – To monitor soil acidity (ideal: 5.0–6.0 for elderberries)
- ● Compost or mulch – For improving soil health and drainage (5-10 gallons)
- ● Plant support stakes – If elderberries are young or leggy (2-4 stakes per plant)
- ● Label markers – To track treated vs. untreated plants
- ● Camera or smartphone – For documenting symptoms before/after treatment
How to diagnose and manage elderberry plant diseases
Here’s my straightforward approach to keeping your elderberry bushes healthy and thriving.
🌿 Step 1: Recognize Common Symptoms Early
Start by inspecting your elderberry leaves, stems, and berries regularly. Powdery mildew appears as a white, flour-like coating on leaves, while leaf spot diseases show up as brown or black spots with yellow halos. If you notice blackened canes or oozing sores, that’s likely elderberry anthracnose or bacterial canker.
Don’t wait until the problem spreads. Check plants every 7-10 days during growing season, especially after rain. Early detection means easier treatment. If leaves start dropping prematurely or berries develop mold, act fast—these are clear signs of stress from fungal or bacterial invaders.
💧 Step 2: Improve Airflow and Reduce Moisture
Elderberries love space, so prune out crowded branches to increase airflow. Thin out stems so light can reach the center of the bush—this alone cuts down on fungal spores that thrive in damp, shaded conditions. Remove any dead or diseased wood immediately, using clean, sharp pruners to avoid spreading pathogens.
Water at the base of the plant in the morning so foliage dries quickly. Avoid overhead sprinkling, which keeps leaves wet for hours and invites powdery mildew. If your soil drains poorly, amend it with compost to improve structure and reduce standing water.
✂️ Step 3: Apply Preventative Fungicides
Use a copper-based fungicide or neem oil spray as a preventative measure every 2-3 weeks during the growing season. Mix the fungicide according to label instructions and apply it in the early morning or late afternoon when temperatures are cooler. This helps protect leaves before fungal spores take hold.
For existing infections, reapply the fungicide every 7-10 days until symptoms disappear. Always spray undersides of leaves—this is where many fungal spores hide. If you notice blackened canes, prune them out completely and dispose of them in the trash, not the compost.
☀️ Step 4: Strengthen Plant Health Year-Round
Feed your elderberries with a balanced 10-10-10 fertilizer in early spring to encourage strong new growth. Mulch around the base with 2-3 inches of organic mulch to retain moisture and regulate soil temperature. This helps the plant fight off stress, which makes it less susceptible to diseases.
In late fall, remove all fallen leaves and debris from around the bush. These can harbor fungal spores over winter. Prune lightly to shape the plant and improve airflow, but avoid heavy pruning—this can stress the plant and leave it vulnerable to infections.
🌱 Step 5: Monitor and Adjust as Needed
Keep a garden journal to track when diseases appear and what treatments worked. Note weather conditions, like heavy rains or prolonged humidity, which often trigger outbreaks. If you see repeated issues, consider adjusting your watering schedule or improving drainage.
Rotate fungicides if you notice resistance developing. For example, alternate between copper-based sprays and sulfur-based treatments. Healthy elderberries with strong growth are far less likely to fall victim to diseases, so focus on prevention as much as treatment.
Tips & tricks for managing elderberry plant diseases
Here’s what I’ve learned after dealing with fungal issues in my own elderberry bushes—these tricks will help you stay one step ahead of common problems.
Timing is Everything: When you spot symptoms in Step 1, don’t wait to act. I’ve seen powdery mildew spread from a single leaf to the whole bush in just 7-10 days—that’s why regular inspections are critical. Grab a magnifying glass if you need to; catching those early yellow halos around leaf spots makes all the difference. The sooner you act, the less fungicide you’ll need later.
Pruning Strategy: In Step 2, when thinning out crowded branches, aim to remove about 20-30% of the oldest wood first. This improves airflow dramatically and reduces fungal spores hiding in dense foliage. I always sterilize my pruners with rubbing alcohol between cuts—this prevents accidentally spreading diseases to healthy parts of the plant. Also, never prune when leaves are wet; wait until morning after dew dries.
Fungicide Application Tips: For Step 3, I’ve found that applying neem oil in the early morning works better than afternoon sprays because cooler temps prevent rapid evaporation. When treating infections, add a drop of dish soap to your fungicide mix—it helps the solution stick to leaves better. And remember: those 7-10 day reapplication intervals are non-negotiable for stubborn infections like anthracnose.
Preventative Maintenance: The 2-3 inches of organic mulch mentioned in Step 4 isn’t just about moisture—it’s also a barrier against soil-borne pathogens. I like to use straw mulch because it breaks down slowly and improves soil structure over time. In fall, when cleaning up, I double-bag all diseased plant debris and leave it out for a week before trash pickup to ensure spores don’t spread through my compost.
Pro Tips for Elderberry Plant Diseases
- Here’s what I’ve learned after dealing with fungal issues in my own elderberry bushes—these tricks will help you stay one step ahead of common problems.
- Timing is Everything: When you spot symptoms in Step 1, don’t wait to act.
- Pruning Strategy: In Step 2, when thinning out crowded branches, aim to remove about 20-30% of the oldest wood first.
Frequently asked questions
Got questions about elderberry plant diseases?
You’re not alone! Here are answers to the most common concerns—from spotting symptoms to saving your harvest.
What are the most common elderberry plant diseases?
The top culprits include powdery mildew (white, powdery patches), anthracnose (dark leaf spots), botrytis blight (gray mold on fruit), and septoria leaf spot (small brown lesions). Wet conditions and poor airflow worsen these issues. Early detection is key—remove infected leaves promptly!
How do I tell if my elderberry plant has a disease vs. pests?
Diseases often show as fuzzy growths, spots, or wilting (e.g., powdery mildew’s white coating). Pests like aphids or mites leave holes, chewed edges, or sticky residue. Check undersides of leaves—diseases spread via spores, while pests are usually visible crawling. Use a magnifying glass for close-ups!
When is the best time to treat elderberry diseases?
Act at the first sign—don’t wait for symptoms to spread! Treat powdery mildew in spring/summer with neem oil or sulfur sprays. For anthracnose, apply copper fungicide in early spring before buds swell. Prevention (like pruning for airflow) is easier than curing!
Are there natural remedies for elderberry plant diseases?
Yes! Try these DIY fixes:
- Baking soda spray: Mix 1 tbsp baking soda + 1 tsp soap + 1 gallon water (for mildew).
- Garlic/chili spray: Blend 2 garlic cloves + 1 tbsp cayenne + water (fungicidal properties).
- Compost tea: Boosts soil microbes to outcompete pathogens.
My elderberry plant is dying—can I save it?
Don’t give up! Prune infected branches (sterilize tools with rubbing alcohol), improve drainage, and space plants for airflow. If roots are rotting (phytophthora), replant in well-draining soil. Pro tip: Start fresh with disease-resistant varieties like ‘York’ or ‘Concorde’ if needed.
Wrapping up and next steps
Protecting your elderberry plants from diseases doesn’t have to be overwhelming—just stay vigilant, proactive, and patient. 🌱 By identifying symptoms early, using organic or chemical treatments wisely, and prioritizing prevention (like proper spacing and sanitation), you’ll keep your plants thriving for years. Now’s the time to act! Grab your gardening gloves, review your notes, and give your elderberries the care they deserve—your future harvests will thank you!